Every tomato you grow contains next year’s seeds. Here is the complete process for saving them correctly — fermentation, drying, storage, and what actually keeps seeds viable for years.
Every tomato you grow contains the seeds for next year’s garden. Most gardeners never think about this — they buy new transplants or seeds each spring and the cycle repeats. But saving seeds from your best tomatoes is one of the most rewarding skills in the garden, and once you understand the process, it takes about ten minutes per variety.
Seed saving connects you to something older than any garden center. The heirloom varieties that home gardeners prize most — Cherokee Purple, Brandywine, Mortgage Lifter — exist today because generations of gardeners saved seeds from their best plants and passed them forward. Every one of those varieties started as someone’s garden tomato.
Beyond the history, there are practical reasons to save seeds. It costs nothing after the first season. The seeds you save are adapted to your specific climate and soil. Over multiple seasons, saved seeds often produce plants that outperform purchased ones in your specific conditions. And if you find a variety that performs exceptionally well in your garden, saving seeds guarantees you can grow it again.
This guide covers exactly how to save tomato seeds correctly — the fermentation process that matters, which varieties you can save from, how to store seeds properly, and how to test viability before planting.
Which Tomatoes Can You Save Seeds From?
This is the most important question to answer before you start, and the answer matters a great deal.
Open-pollinated and heirloom varieties — Save away. Seeds from open-pollinated tomatoes grow plants that are true to the parent. If you save seeds from a Cherokee Purple, you get Cherokee Purple plants next year. This includes all heirloom varieties and many older standard varieties. These are the varieties worth saving.
Hybrid varieties (labeled F1) — Do not save. Hybrid tomatoes are produced by crossing two different parent varieties. The seeds they contain do not grow true — they revert to unpredictable combinations of the parent genetics. Some may resemble the parent plant, most will not. If Celebrity, Early Girl, or any variety on your seed packet says F1 or Hybrid, save your time and buy fresh seeds each year.
How to tell the difference: Check the seed packet or plant tag. Heirloom varieties will say “heirloom” or “open-pollinated.” Hybrid varieties say “F1” or “hybrid.” If you are not sure, a quick search for the variety name will tell you.
If you are growing heirloom varieties and want guaranteed true-to-type seeds, the guide on best organic tomato seeds covers the top open-pollinated and heirloom varieties worth growing and saving.

Choosing the Best Tomatoes for Seed Saving
Not every tomato in your garden is worth saving seeds from. Seed saving is most effective when you are selecting intentionally — choosing parents that represent the best characteristics of the variety.
Choose tomatoes that are:
- Fully ripe — not just table-ripe but deeply ripe, even slightly past peak eating stage. Seeds inside a deeply ripe tomato are fully mature and have the highest germination rates.
- From the healthiest, most productive plants in your garden
- True to the variety’s expected characteristics — correct color, size, shape, and flavor
- Free of disease symptoms — do not save seeds from plants that showed significant signs of blight, mosaic virus, or other diseases, as some pathogens can be seed-borne
Avoid saving from:
- The first fruit of the season — later-season fruit from well-established plants tends to have more mature seeds
- Unusually small or misshapen fruit — these may indicate stress or abnormal development
- Plants that showed significant disease pressure, poor flavor, or off-type characteristics
This intentional selection, done consistently over multiple seasons, is how home gardeners gradually improve their saved seed lines — selecting for the characteristics that matter most in their specific garden and climate.
Why Tomato Seeds Need Fermentation
This surprises a lot of first-time seed savers — you cannot simply dry tomato seeds and plant them next year. Well, you can, but germination rates will be significantly lower than properly processed seeds.
Tomato seeds are surrounded by a gelatinous coating that contains germination inhibitors — compounds that prevent the seed from sprouting inside the moist, warm tomato. In nature, a tomato falls to the ground and rots. The rotting process breaks down this coating through microbial fermentation, releasing the seed to germinate in soil.
When we save seeds at home, we replicate this process through a brief controlled fermentation. It takes 2–3 days, requires no special equipment, and dramatically improves germination rates compared to seeds that were simply rinsed and dried.
There is a secondary benefit: the fermentation process also kills many seed-borne pathogens, including some fungal and bacterial diseases that can carry over on seed surfaces.


Step-by-Step: How to Save Tomato Seeds
What You Need
- One or more ripe, healthy tomatoes from an open-pollinated variety
- A small glass or jar per variety
- Water
- A fine mesh strainer or paper towel
- Small envelopes or paper packets for storage
- A permanent marker for labeling
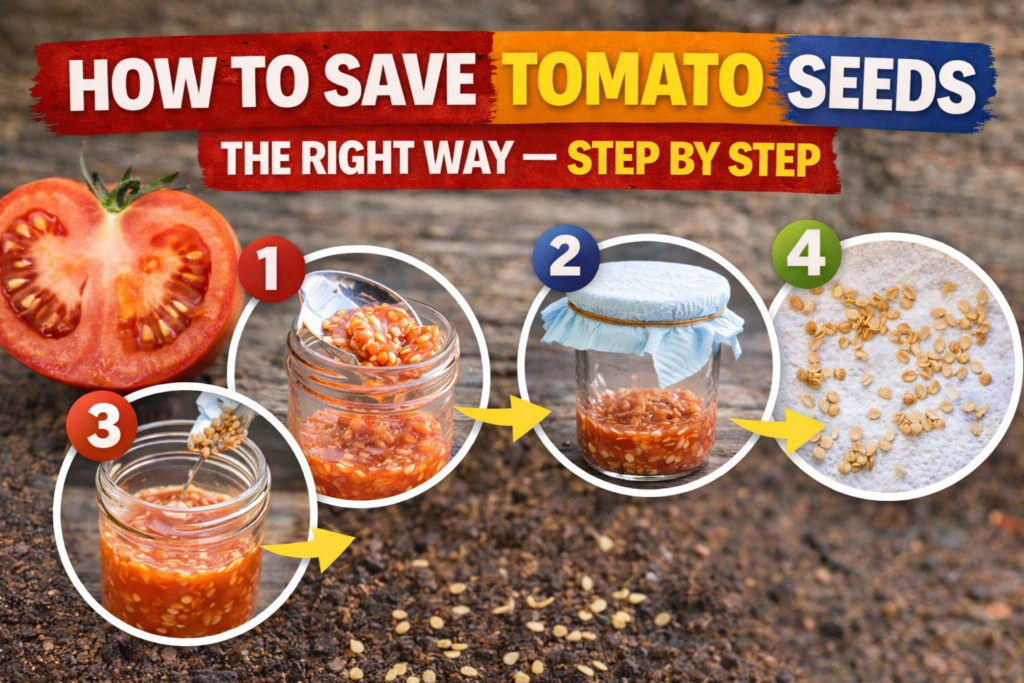
Step 1: Choose and Slice the Tomato
Select a tomato that is deeply ripe — fully colored and slightly soft. The seeds inside are fully mature at this stage.
Slice the tomato in half across its equator — horizontally, not stem to bottom. This exposes the seed cavities cleanly without cutting through the seeds.
Step 2: Squeeze Seeds Into a Glass
Squeeze or scoop the seed gel from each cavity into a small glass. Use your finger or a small spoon to help. You want the seeds along with the surrounding gel — the gel is what needs to ferment.
Add about equal volume of water to the glass and stir briefly. Label the glass immediately with the variety name — this is a step many people skip and regret when they have three glasses on the counter by day two.
If you are saving multiple varieties, use separate glasses for each and label them all before you start.
Step 3: Ferment for 2–3 Days
Set the glasses in a warm spot — a kitchen counter away from direct sunlight works perfectly. Room temperature between 65–75°F is ideal. Cover loosely with plastic wrap or a paper towel to keep out debris but allow some air circulation.
Over the next 2–3 days, the liquid will become cloudy and a layer of mold will form on the surface. This is normal and expected — the mold is part of the fermentation process that breaks down the gel coating. The smell will be unpleasant. This is also normal.
Timing matters: Two to three days is the sweet spot for most conditions. Under-fermented seeds still have gel coating that reduces germination. Over-fermented seeds (more than 4–5 days, especially in warm conditions) can begin to sprout or lose viability. Check daily after day two.
How to know it is ready: Viable seeds sink to the bottom of the glass. Non-viable seeds and debris float. When most seeds have sunk and a distinct floating layer has formed on top, fermentation is complete.
Step 4: Rinse the Seeds
Pour off the floating layer — mold, debris, and non-viable seeds — carefully. Add clean water, swirl, and pour off again. Repeat until the water runs relatively clear and only the sunken seeds remain.
Pour the remaining liquid and seeds through a fine mesh strainer. Rinse under running water while rubbing the seeds gently between your fingers to remove any remaining gel coating.
Step 5: Dry the Seeds Thoroughly
Spread the rinsed seeds in a single layer on a non-stick surface — a ceramic plate, a piece of wax paper, or a coffee filter works well. Avoid paper towels — seeds will stick to them and are difficult to remove without damage.
Set the drying surface in a warm, dry location with good air circulation. Do not use heat — an oven, a dehydrator, or direct sun — as excessive heat damages seed viability. Room temperature drying is correct.
Stir or move the seeds once or twice a day to prevent clumping. Most tomato seeds are fully dry within 1–2 weeks depending on humidity. Fully dry seeds feel hard and do not flex when pressed between your fingers. Seeds that are not fully dry will mold in storage.
Step 6: Package and Label
Once fully dry, package seeds in small paper envelopes or folded paper packets. Paper breathes and allows any remaining moisture to escape — plastic bags trap humidity and can cause mold even in seeds that seemed dry.
Label each packet clearly with:
- Variety name
- Year saved
- Location or plant notes if relevant (e.g., “best producer in the garden,” “from the east bed”)
This information is easy to record now and nearly impossible to reconstruct later.

How to Store Saved Tomato Seeds
Proper storage is what separates seeds that germinate at 90% next spring from seeds that barely germinate at 20%.
The enemies of seed viability are heat, humidity, and light. Control all three and tomato seeds maintain high germination rates for 4–6 years or longer.
Ideal storage conditions:
- Cool — below 50°F is ideal; a refrigerator works well
- Dry — relative humidity below 50% if possible
- Dark — a drawer, cabinet, or sealed container away from light
Practical storage approach:
Place labeled seed packets inside a sealed glass jar or airtight container. Add a small silica gel desiccant packet to the container to absorb any residual moisture. Store in the back of a refrigerator, a cool basement, or a temperature-stable cabinet away from the kitchen stove and any heat sources.
Do not store seeds in a garage or shed where temperatures fluctuate dramatically between seasons. The repeated warming and cooling cycles accelerate moisture exchange and significantly reduce long-term viability.
Freezing seeds: Tomato seeds can be frozen for very long-term storage — 10 years or more — if they are completely dry before freezing. Partially dry seeds will be destroyed by ice crystal formation. If you want to freeze seeds, extend the drying period by an additional week beyond what seems necessary before packaging and freezing.
Testing Seed Viability Before Planting
If you have seeds that have been stored for more than 2–3 years, or seeds you are not certain were properly dried and stored, a quick germination test tells you what you are working with before you commit to a planting schedule.
Simple germination test:
- Count out exactly 10 seeds from the packet
- Dampen a paper towel — moist but not dripping wet
- Place the 10 seeds on one half of the paper towel and fold the other half over them
- Seal in a plastic bag and set in a warm location — 70–80°F
- Check daily starting on day 5
Count germinated seeds at day 7 and day 10. The number that germinate out of 10 gives you a direct germination percentage.
- 8–10 germinating (80–100%): Excellent. Plant at normal spacing.
- 5–7 germinating (50–70%): Acceptable. Plant slightly more densely and thin to the strongest seedlings.
- Below 5 germinating (below 50%): Poor viability. Either plant very densely to compensate, or source fresh seeds for this variety.
This test takes two minutes to set up and eliminates the frustration of planting a full tray of seeds and getting three seedlings two weeks later.

Keeping Varieties Pure: Preventing Cross-Pollination
Tomatoes are predominantly self-pollinating — the pollen from a flower usually fertilizes that same flower before any outside pollen can intervene. This makes them much easier to save pure seeds from than cross-pollinating vegetables like corn or squash.
However, cross-pollination does occasionally occur, carried by bumblebees practicing buzz pollination between different varieties growing nearby. For home gardeners growing a few varieties in a backyard garden, the occasional cross is unlikely to meaningfully affect seeds, and the results if it does happen are more interesting than catastrophic.
If you want to ensure complete purity — particularly for rare or treasured varieties — the simple solution is to bag individual flowers before they open with a small fabric or paper bag, and hand-pollinate by transferring pollen with a small brush between flowers on the same plant. Remove the bag after pollination. Mark the fruit that developed from the bagged flower so you know which tomato to save seeds from.
For most home gardeners saving seeds informally, this level of control is not necessary. Grow your favorite open-pollinated varieties, save seeds from your best fruit, and enjoy results that are overwhelmingly true to type.

Saving Seeds as Part of a Self-Sufficient Garden
Seed saving fits naturally into a broader homesteading and self-sufficient growing approach. Once you have saved seeds from a variety for two or three seasons, you have a genuinely locally adapted seed line that is yours — not dependent on a seed company, not subject to availability issues, and increasingly well-suited to your specific soil and climate.
Combined with a productive garden setup — good soil preparation, consistent watering, appropriate feeding, and the right varieties for your zone — seed saving closes the loop on the growing cycle in a satisfying and practical way.
For the broader picture of getting the most out of a home tomato garden, the guides on how to grow tomatoes faster — 10 proven tricks that work and 9 tomato growing tips that actually work cover the fundamentals that make everything else more effective.
Frequently Asked Questions
How long do saved tomato seeds last?
Properly dried and stored tomato seeds typically remain viable for 4–6 years. Some sources report good germination at 10 years or more under ideal conditions. Poorly stored seeds may lose significant viability within a single season.
Can I save seeds from store-bought tomatoes?
You can try, but results are unpredictable. Most grocery store tomatoes are hybrid varieties, which means saved seeds will not grow true to the parent. Grocery tomatoes are also often picked before full ripeness, meaning seeds may not be fully mature. Heirloom varieties from a farmers market or garden are much better candidates.
Do I have to ferment the seeds?
Fermentation is not strictly required but significantly improves germination rates by removing the gel coating that contains germination inhibitors. Seeds that are simply rinsed and dried will germinate — just at lower rates, especially after storage.
How many seeds should I save per variety?
At minimum, save 20–30 seeds per variety. This gives you enough for multiple planting attempts, sharing with other gardeners, and a buffer against poor germination years. A single ripe tomato typically contains 50–100+ seeds, so one good fruit is usually more than sufficient.
Can I save seeds from cherry tomatoes?
Yes — cherry tomatoes save extremely well. The fermentation and drying process is identical. Cherry tomatoes often have high seed counts per fruit and excellent germination rates from saved seeds.


Related Articles
- How to grow a tomato plant from a tomato
- Is it possible to grow a tomato plant from a tomato
- Best organic tomato seeds — don’t miss this
- These seedling heat mats fix slow tomato germination fast
- These peat pellets make tomato seed starting almost effortless
- Tomato plant stages week by week — what to expect and what to do
- Things I wish I knew before growing tomato plants
- Determinate vs indeterminate tomatoes — what the difference actually means for your garden
About the Author
Laura Hendricks has been saving tomato seeds in her Zone 6b garden for over a decade, building a small collection of heirloom varieties that are now deeply adapted to her specific soil and climate. She writes practical guides for home gardeners who want to grow more intentionally and rely less on what is available at the garden center each spring.
As an Amazon Associate we earn from qualifying purchases through some links in our articles.